by Anna Hicks

Fayette, Michigan, buildings by Dave Alexander.
If taking photos is your passion, you have probably not only visited many historical sites but also used presets to edit the same photos. The thing to remember is that taking and editing photos of historical sites and buildings is a little different than taking and editing shots of other things, such as weddings and people. With that in mind, read on for a few top tips on doing both the right way.
Get Up Early
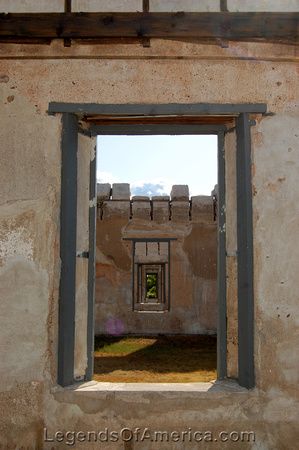
Fort Laramie, Wyoming. Officer Row Windows. Photo by Kathy Alexander.
If you want to take photos of breathtaking historical sites like Fort Laramie, you need to be an early riser so you can get it in the right light. Although very few people want to wake up early on a vacation, for us photographers, it’s a really big advantage. What are the benefits of taking these photos in the early morning, you might ask? Simple, you don’t have to worry about people stepping into your shot. After all, you’re there to photograph the site, not the people. Also, it lets you take the shot in a soft, gentle light, which helps with editing later on.
Make Sure to Go in Fully-Equipped
Whether it’s Black Mountain or an old Civil War building, you are going to appreciate a wide lens when capturing your shots. Historic buildings and other historic sites are usually immense, and you want to be able to get everything in your image. If the day is bright and sunny, make sure to include a polarizing filter in your camera bag. This is the perfect way to ensure no pesky reflections in windows come through to ruin your shot. While editing can do a lot, it may not be able to take out those reflections.
Remember, not every day will have the perfect conditions for the gorgeous shots you want to take. It is possible that the historic site you are photographing has poor lighting conditions, so never fail to bring your tripod. Not only does this make it possible to capture panoramic images, but it also helps when capturing images with a smaller aperture, allowing you to get crystal-clear details.
Use Varied Conditions
Don’t just take your photos in the morning light; using varied conditions can make all the difference in the photos you get, and even the photos you decide to keep during editing. Try returning to the site during the evening, in a different light, or even in different weather to get the best shots you can. For example, taking photos of historic sites at sunset can add a dramatic touch to your photos that might not have come across in different lighting conditions. You can use Lightroom Presets to enhance the colors, depth, and composition of your photos.
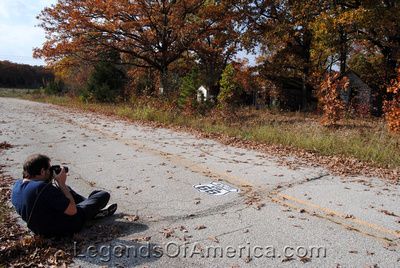
Taking photos of John’s Modern Cabins along old Route 66 in Missouri.
Shoot from Unconventional Angles
Shooting from unconventional angles is another way to ensure your shots are unique and to capture the historic site from every angle possible. For example, capture the building from the opposite side of where people are gathered for a lonely, forlorn look that often speaks to the building’s history. Don’t ignore the atypical shots and views, however, as they have their place in these photos as well.
Put Your Focus on the Details
As you have probably been told most of your life, the devil is in the details. Photography of historic sites is no different. Close-ups of gravestones in the local historic cemetery, or the moss-laden tree at the historic haunted church you are visiting, can pack quite a punch after editing is done. If you arrange the photos into a photo series, you can really capture the building’s overall atmosphere and take people’s breath away with your work.
Always, Always Take Your Time

Buildings on Alcatraz Island, 2009. Kathy Weiser-Alexander.
The one thing you always, always want to do when snapping photos of historic sites is to take your time. Take your time and enjoy the passion you have for not only historic sites but also photography. There is nothing wrong with slowing down and loving what you’re doing. Whether you are taking the photos for a local magazine you work for, or just because it’s your hobby, you want to enjoy it. Whether it’s in the morning, evening, or in good or bad weather, take your time and be patient. After all, these historic sites have stood in these spots for many, many years and have stories to tell. You can capture those stories one frame at a time.
Editing
Now that you have your gorgeous photos and have followed the tips above to capture them, it’s time for editing. Of course, you already have Lightroom and are using the presets. You want your images of historic sites to rock, though, even more than they already do, don’t you?
Well, you can do that by following the steps below.
- Make sure your composition is right. If not, crop it.
- Check your highlights to see that they are perfect.
- Check the shadows in the photo, just in case you overexposed the image.
- If you shoot wide, you may end up with dark corners and vignetting in your photos. Check for these problems and then fix them.
- Check your color and hue. This is up to you, as everyone wants different colors and hues in the subjects they photograph.
Editing doesn’t have to be hard; in fact, it can be as simple as taking the photograph. Many photographers have a passion for taking photos, but editing is not so much of a passion. With Lightroom Presets, the editing is quick and simple, and the results can be downright stunning.
These are just a few of the tips and tricks out there that you can use to photograph and then edit the historic sites you visit. Whether it is for work, photography contests, or it’s something you just love to do, following these tips will ensure that your historic pictures can become pieces of history themselves. Happy picture taking, everyone!
©Anna Hicks, updated March 2026.
About the Author: Anna Hicks is the blogger behind paidtwice.com. While she once wanted to be a teacher, she now gets her history fix by writing about it. She also enjoys writing about DIY, personal finance, and her terrible cooking skills.
Also See:
National Parks, Monuments & Historic Sites
Legends Of America’s Photo Travel Blog
Quirky and Offbeat Roadside Attractions
Scenic Byways & Historic Trails
See Sources.